Thursday, January 18, 2018

Jump on in! Try the Jumpsuit!

Hi, It's Laura again! I'm a guest here again today to tell you all about the Jumpsuit pattern and why I love it!


A couple of weeks ago, when I wrote the blog post for the Reversible Overalls, I mentioned that I LOVE rompers. Well, it should be no surprise that I LOVE the Jumpsuit pattern! Another easy, one-piece outfit. This one is for knits though, and knits are just so comfy to wear! So, there are LOTS of reasons to love this little pattern. I've made two so far, and will undoubtedly use this pattern again! 


I made it by the fabric store on Monday this week. Well, you know how it feels when you are fabric shopping, and you stumble across a fabric you love, and you know exactly what you want to do with it? It's just like it was meant to be! 

 When I went to Joann's. I knew when I ran across this fabric that NEEDED to be a jumpsuit. I could already picture a little polar bear jumpsuit with white coordinating sleeves. I came home, and before doing anything else, prewashed the polar bear fabric. It's a Doodles knit. I prewash everything anyway, but if you get a Doodles knit from Joann's, you know you HAVE to prewash because it shrinks. So, it was washed and ready for whenever I had time for it. I went ahead and reprinted the pattern. The first one I made was a tad big on Luke and I had to hem it a lot. We just had our nine month check-up this week, and his length actually fits perfectly into the smaller size. I have no idea what I was thinking when I made the first one. But, it is super hard to measure a baby's length. They're squirmy and like to wiggle, so maybe I thought he was longer than he is? Ha. So, I printed and cut the pattern a size smaller. 

 On Tuesday, I wanted to cut my fabric out so badly, but had ZERO time all day long. Like for real, this might be the only thing I thought about all day Tuesday.  Then, on Tuesday night, after the kids were asleep, I got out my stuff and cut out my fabric. FINALLY! WOO HOO!  


I decided for this one to make the snap strip a little narrower than the pattern suggests. So, if you've made it you may notice that mine looks smaller. My husband had an old undershirt with a hole he was getting rid of so I used that for the snap placket. It was perfect, and I didn't have to waste any precious fabric! I also added some interfacing to the snap placket.  I mentioned that I wanted a white coordinate. I looked at Joann's, but they didn't have any. They rarely have solids that I actually like though, so I wasn't super surprised. I didn't have any at home either.  I went to my "stuff to upcycle cabinet." I periodically check out thrift stores, and my family checks with me before donating anything, so I keep a whole cabinet full of stuff that has upcycle potential. I grabbed a mock turtleneck shirt I bought from a thrift store a while back. The neck was a nice quality ribbing, perfect for the neckband on this. I cut it in half and saved the rest so I've got another white neckband when I need it! I cut the sleeves of this pattern from the sleeves of the thrift store shirt. The shirt was a nice, thick cotton interlock. Perfect for this! And, Hooray for one less hem! I took a little length off of the sleeve pattern since I won't need to hem the sleeves. This is just another reason that I love upcycling!  Now I've got all of my pieces cut. Let me show you one of my favorite pieces.  I'm allowed to have a favorite pattern piece, right? It's this little cloth diaper extender piece or gusset. It's optional, takes a couple of minutes longer, but is totally worth it if you cloth diaper. You know, they tend to be a little bulkier, and you sometimes have to stretch clothes to fit over them.  You won't have to if you use this piece. It'll give you the prefect fit!  


 Now, on to the sewing!! The pattern goes together fairly easily. It includes those excellent photo instructions that you expect from PDF pattern designers. The first time I made the pattern, I made it exactly as is, and it went together perfectly. As I mentioned before, it was a TAD big because I apparently had no idea how tall my child is! This time, as I mentioned, I sized down, and made a couple of slight changes. I already mentioned that I narrowed the snap strip this time. The only other thing I did was used a regular tee shirt neckband instead of binding. The binding took a little longer, and I was in a hurry. Like I mentioned, I wanted this done yesterday!  Since I'm pretty quick with regular neck bands, that's what I did.

I sewed everything together, and as I mentioned a post in the Mamma Can Do It Facebook group, it's not perfect but it's "good enough" and "good enough" is my new motto. If I want anything done, I don't have time for perfection. Haha Maybe one day, but while my boys are little, with most of my projects, I just don't take time for things such as going slowly!  

When I finished sewing, it was already after 11 PM, so I decided that snaps had to wait until Wednesday. On Wednesday, we decided to go to my sister's house. She always takes pictures for me, so I decided to just take everything over there and put snaps on there. I brought my snap press, my metal snaps, and the outfit. About half way there, I realized I only brought dies for plastic snaps. OOPS! I prefer using metal snaps for the inseam, because they're less bulky and easier to unsnap, but I remembered that my sister had some plastic snaps from a project she had done previously. She's nice, so she let me use some.  I didn't want to wait to put snaps on when I got back home, because I REALLY wanted to take advantage of the fact that we were at her house with her nice camera. At home, I have a cell phone camera, and as you know, the quality is nowhere near the same! So, I went with plastic snaps for this outfit! 

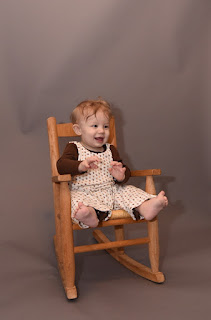
I'm in LOVE with the finished jumpsuit! This is such a cute pattern! 


If you don't have it yet, this pattern will be on sale through Friday (01/18) ONLY! You should really consider trying it out for yourself.  


If you're not QUITE convinced yet, let me highlight a few reasons that I LOVE it! 
  • It is for knit fabrics. Knit fabrics are super comfy for babies! They're just easy to wear and play in. 
  • It has inseam snaps. I know – this may not seem like a big deal, but it is for me. I've been drawn to a similar pattern before because I like the style, but there are no snaps. The whole thing pulls on from the neck. This may not be a huge deal, but I don't want to undress the baby just to change a diaper! TOO MUCH WORK. 
  • It's a comfortable fit. It's not super tight, so it's perfect for chubby babies ðŸ˜‰  
  • It has the optional gusset/ cloth diaper extender piece. This gives you the perfect fit over cloth diapers without stretching and pulling your fabric! 
  • Plenty of support from the Facebook Group if you need help or have questions.  
  • And the sale price is AMAZING! 
**I have inserted links throughout this post that direct you to my affiliate link for this pattern.* 

Or of course, you can always navigate the website and find it for yourself  ðŸ˜‰  

Tuesday, January 16, 2018

Lapped Baby Shirt Tank Tutorial


Guest post by Kelsey Lafleur.  It's week 2 of Mamma Can Do It Legacy Winter Promos!  You guys aren't going to want to miss this cute little lapped baby shirt.  It's paired here with the baby boy leggings pattern.  This simple and easy lapped baby shirt has been newly updated and is only $3.50 this week.  I can see it becoming a staple in our house.  We are also a cloth diaper family, and there's nothing I love better than a longer play t-shirt with a simple cloth diaper on hot summer days for my little guy.  I know I seem crazy for even thinking about summer right now, but here in southern Alabama, our winter is almost over.  This pattern also has long sleeves, short sleeves, as well as the tank binding option which was not previously available.  The tank binding is included in the pattern, but it does not have the picture tutorial yet so that's what I'm here to tell you about.   

Tank Lapped Baby Shirt Tutorial

 I love to recycle old t-shirts for my kid's play clothes especially when the shirts don't have a side seam.  It's a built in fold and you don't have to hem!!  If you like your kid's t-shirts a little long like I do, then place the pattern piece at the bottom of the shirt hem.  If you would like to keep the shirt the length of the pattern, then place the pattern bottom 1 inch below the shirt hem to account for the hem allowance.  I just know you guys love my pattern weights here.

Note:  There is a slight curved hem to the pattern, and so using the hem of this shirt will make the shirt have a straight hem instead of the intended slight curve.

 Go ahead and cut out your front and back shirt pieces.  I usually cut a little notch along the arm to help me keep track of which one is the front and which is the back.
 Two notches for the back.

 Cut out your two tank top arm bands.
 Iron and press each arm band in half lengthwise.  Mark the center of each.

 Attach your neckbands according to the tutorial in the pattern.
 You will then overlap the back piece over the front.  The overlap will measure 3 inches like shown in the pattern tutorial.  Now if I were a good teacher, I would say you should baste along that 3 inch edge like so.  I always regret not basting.  Do as I say and not as I do.  I did not baste. 
 Find the center of the armscyle.  Use the marked center of the tank band and match it to the center of the armscyle.  Pin or clip at the center markings and match the end of your band with the end of the armscyle.  Your lapped baby shirt will have the right side facing up. 


Your band will be smaller than your armscyle so you will have to stretch the band as you clip around the armscyle.  Since I didn't baste, I made up for it in over clipping.  Sew your bands into place with a zig zag or similar stretch stitch.  Your seam allowance will be 3/8ths of an inch here.  I used a serger to sew mine onto the shirt.

You can topstitch your seams down here with a zig zag or stretch stitch, but I just left mine and pressed the seam inward.  Now all you have left is to place your shirt right sides together and sew your side seams.  I love when I don't have to hem at all!


I love it!  Your little lapped baby tank is complete!  I added a vinyl cut file design to mine from here.  Little mister is ready for Valentine's Day now! 


Disclaimer:  This guest blog post does contain affiliate links.

Wednesday, January 3, 2018

Goodbye Ziploc bags!

2018! It's a new year, and that means resolutions! Goals! It's an exciting time, and I can't wait to get started. One of my big goals for the year is to reduce my waste. I already cloth diaper my son, and that's what got me started thinking about how much STUFF I am constantly throwing away. A lot of those things come from the kitchen.

I'm trying to lead a healthier lifestyle, one without take out or fast food. That means bringing my lunches and cooking ahead. For my son, it means bringing healthy snacks with us rather than getting him something spur of the moment when we are out. Both of those things need a lot of Ziploc bags. I am constantly running out, and that's expensive, and I realized, wasteful. So when I saw the sandwich/snack bag pattern from Mamma Can Do It, I was super excited.

The tutorial is simple and comes with two sizes ready to go. I selected the larger size. The tutorial is really easy to follow and has great tips for beginning seamstresses. I have personally never sewn with velcro before this, and was a little nervous, but it was definitely much easier than expected! The bonus part of using velcro instead of snaps or a zipper is that my 2 year old son can easily open and close it all by himself--something he couldn't do with the regular Ziploc bag.


I am so excited to make sets of these bags, for my son and for myself. I love that my son can pick out his favorite fabrics, and that the bags come together so quickly that I can make as many as we need without worrying about time constraints. I love that I can set about on my New Year's Resolution, and that it's the easiest resolution I could have, thanks to these bags (and another pattern I'll tell you about later).


Tuesday, January 2, 2018

The Reversible Overalls - Your Next FAVORITE!

Hi, I'm Laura! I have two boys who are three years old and almost nine months old. They are the reason I sew!  You'll get to see my baby, Luke, today in some of the photos I share. I am a guest here today writing about the MCDI Reversible Overalls. I got to know Elizabeth through her Facebook group, and I am part of her testing and promotional team. I'm excited to share with you my thoughts on this fabulous pattern! 


I love one-piece outfits for babies! They're just so cute and practical! I had a friend tell me one time that you would know when she woke up late because those were the days she wore dresses. Her phrase was "one and done." You don't have to match anything and you only have to put on one piece. This is how I feel about rompers! They're just easy.  

I have found a new LOVE in the Mamma Can Do It Reversible Overalls. It's easy to put on the baby, it’s a one piece outfit, and the best part is that (as its name suggests) it is REVERSIBLE! Two outfits taking up one hanger in the closet! He can wear it Monday, wash it, wear it again later in the week and nobody will realize that it's the same exact thing! 


So, now let me tell you about these little overalls. 

Luke usually wears about a 12 month in store bought clothes. He's a cute little chubby thing! So I was torn between making the 6-12 month and the 12-18 month. But I decided, that with the roll up cuffs, a little extra room is never a bad thing because babies grow TOO fast. I was excited that the fit was PERFECT for him, and there is extra length that can be rolled down when he grows!  


I really liked the way the romper was constructed. It went together so easily. I have made a lot of rompers, and I've never made one the same method as this one. I honestly was surprised at how easy this pattern was!  I like also, that this pattern has both shoulder snaps and inseam/ crotch snaps. So many patterns leave off the crotch snaps, but honestly, they make diaper changes so much easier for me. I really love it when they're included on a pattern. No modifications for me! If you've never done snaps before, they're so EASY! I chose to use size 20 plastic snaps for the shoulders, because I have a ton of those, and size 16 metal snaps for the inseam because they are easier for me to unsnap for diaper changes. I ordered all of my snap supplies directly from the KamSnaps website. Although, I know you can get Dritz plastic snaps and pliers from some local stores. I've personally had great luck with my KamSnaps though!  


So what type of fabric can you use? 

I love that this pattern can be made with regular woven (non-stretch) fabrics. I'm always drawn to the quilting cotton section when I go to the fabric store. There are so many choices, so many cute prints! So, I love finding more patterns that can use these fabrics! The outside of the romper (the red side) is wrinkle ease cotton twill I bought from Joann's. I had just enough of this left over from a different project for these.  The lining (the train side) was quilting cotton from Joann's Fabric. Since this pattern uses woven fabrics, you'll have endless possibilities available to you! 

Did I make any changes? 

The only change I made to this pattern was that I added a pocket. I wanted a little contrast from the opposite side to show! I think the pocket looks so cute since you have the cuff on the bottom. 


Other Ideas I HAVE: 

I'm planning on making some with an embroidery or applique on the top piece too! For real, the options you'll have with this pattern are limitless! I tend to be drawn to expensive, high price tag boutique outfits for my boys. I love when I can use a pattern to create a similar look! Another thing you might do to "dress it up" a little is try piping in the seam attached to the pants. You could really make a nice outfit for Church or another dressy occasion! I can also see these little overalls made in denim lined in the cute tractor fabric I saw at Hobby Lobby recently. Or for a girl, a pretty floral lined in solid pink (or another coordinate) would be SO sweet! 

One last thought... 

I see A LOT of posts on the Facebook sewing groups asking, "Do I need a serger?" And "Can I use non-stretch cotton fabrics?" If you have these questions, this pattern is FOR YOU! If you don't have a serger, this is fully lined, so no one will ever know! And as I mentioned before, this is a great pattern for your woven fabrics! 

THE RUN DOWN - REASONS TO PURCHASE:
  • Easy!
  • Support from the designer and many, many others in the facebook group
  • All seams are fully enclosed, leaving you with a professional finish!
  • It's reversible!
  • It's drafted for WOVEN FABRICS!
  • It's ON SALE!! 🎉
This week, the Reversible Overall Pattern is on sale for only $3! It's a steal at this price! Go check them out! I PROMISE you don't want to miss out on them!!  


https://mammacandoit.com/collections/baby-patterns/products/reversible-baby-overalls-pattern?aff=60