Sunday, November 22, 2015
Tuesday, June 24, 2014
Sugar Butt Baby Bloomers Pattern
This baby bloomers pattern will rock your world! Now you can make them incredibly easy and fast. Make them with scrap fabric, or with purchased quilting fabric. Make them with wovens or with knits. Sound exciting and adorable? It's because it IS!
I know it's been a while since I've written - but I've been working in the garden. My garden this year has been plagued with bugs. I've been doing everything from neem oil to hand picking. Nothing seems to be keeping them out except the chickens. Although I love the chickens in my garden to forage for bugs, they wreak havoc on my plants. However, this is not the bloomer pattern that you want to read about. :)
The baby bloomer pattern that is a newbie in my pattern collection, is by far my favorite "diaper cover" of all. I love the gentle ruffles that the elastic makes around the legs. There is plenty of room for a cloth diaper too if you use fluff on your baby.
This design actually started as an accident. I was making a pinafore dress and I didn't really feel like making a ruffled diaper cover. I also didn't have a large enough piece of fabric....all I had was left over scrap. That's when this pair of bloomers (diaper cover) was created:
![]() |
| It's so easy to make that this was how beautiful it was the very first time I made one! |
You can use the baby bloomer pattern to make a diaper cover or pair of shorts for any girl that is size nb-36 months. That's a huge range.
Don't be alarmed when you see the pattern pieces though, they look fairly large - it's not. We have to add extra fabric in there so that it will be nice and puffy. Puffy bloomers are the cutest bloomers.
If you like what you see, simply check out the Sugar Butt Baby Bloomers Pattern right now!
Wednesday, April 23, 2014
Make some money at home!
Mamma income alert!
I'm looking to pay 2 mammas to do some writing for me on a regular basis. This includes payment per article and free use of all of my patterns. :)
I am looking for 2-3 articles per week.
On a side note: I am also looking for someone to post these articles on various sites: blogger, squidoo, twitter, hub pages, linkedin, Delicious , google plus, pinterest (from the pictures), craftsy, stumbleupon, etc. This person will also get paid to put links on other websites and blogs that they use (or would use once they start doing this job for me) such as diaperswappers, mothering.com, general articles from others, etc...
Below is a list of what I am looking for in an article.
Keywords: For a search, google looks for keywords in articles, on picture names (instead of your picture being named IMG_1234, name it something like, "onesie-pattern" ***Be sure to use the hyphen) and on picture tags (alt image tags and descriptions).
Choose your keywords carefully. You want to choose the keywords that are searched frequently. A great tool that I use is google adwords keyword search.
Each article should be based on 1-2 keywords. You can have multiple articles on the same pattern, but if you use different keywords for each article, it's better.
Meta data: when you write an article, include a meta description (what google will show with a google search result) as well as the keywords that you are aiming for.
Images: I don't know about you, but when I search for something on google, I almost ALWAYS click the images tab to SEE what I want, before anything else. Great images that are tagged with good keywords are a valuable asset to any article. To get great images, you can sprinkle in a few of mine from my website, but I am looking for someone who likes to sew and who will take great shots of their project in the works, and of the finished project. I'm also noticing a trend where writers are labeling their images (example like the one below). They are doing this for searchers of google images. The more traffic from images, is more sales on my website.
If you are interested in blogging/writing some articles to make some cash, Please send me an email with a sample of your photography and a sample article. You can pick anything on my website to write a sample article about.
Send your questions and articles to info@mammacandoit.com.
Update: I forgot to mention that I will wait for the articles and not make a decision until May 1st. :)
I'm looking to pay 2 mammas to do some writing for me on a regular basis. This includes payment per article and free use of all of my patterns. :)
I am looking for 2-3 articles per week.
On a side note: I am also looking for someone to post these articles on various sites: blogger, squidoo, twitter, hub pages, linkedin, Delicious , google plus, pinterest (from the pictures), craftsy, stumbleupon, etc. This person will also get paid to put links on other websites and blogs that they use (or would use once they start doing this job for me) such as diaperswappers, mothering.com, general articles from others, etc...
Below is a list of what I am looking for in an article.
Keywords: For a search, google looks for keywords in articles, on picture names (instead of your picture being named IMG_1234, name it something like, "onesie-pattern" ***Be sure to use the hyphen) and on picture tags (alt image tags and descriptions).
Choose your keywords carefully. You want to choose the keywords that are searched frequently. A great tool that I use is google adwords keyword search.
Each article should be based on 1-2 keywords. You can have multiple articles on the same pattern, but if you use different keywords for each article, it's better.
Meta data: when you write an article, include a meta description (what google will show with a google search result) as well as the keywords that you are aiming for.
Images: I don't know about you, but when I search for something on google, I almost ALWAYS click the images tab to SEE what I want, before anything else. Great images that are tagged with good keywords are a valuable asset to any article. To get great images, you can sprinkle in a few of mine from my website, but I am looking for someone who likes to sew and who will take great shots of their project in the works, and of the finished project. I'm also noticing a trend where writers are labeling their images (example like the one below). They are doing this for searchers of google images. The more traffic from images, is more sales on my website.
Content: What I am looking for in the way of content:
- Personal experiences. Take pictures of your experience sewing a project. Talk about each step along the way and what you liked or tweaked to fit your needs. Take pictures of the finished project and talk about how it fits and what you love about it.
- Needs. Talk about why someone needs the product. Take pictures of before and after (example: before the nursing pillow hunched over and after the nursing pillow sitting up straight.). Show the reader why they need the product and sell it!
- A general theme. An example of a general theme would be, how to choose the right size for a baby dress pattern (baby dress pattern being the keyword). Take pictures of multiple baby dresses (whether they are mine or not) and show the fit of them on your baby. There are multiple "general theme" things that I can think of.
- Choose my newest first. As I am adding new patterns, I need them to get out there...so please write articles on my newest patterns first.
- I'm looking for 700-1000 word articles
Video: If you make videos or want to make videos that would be a great way to take the place of an article. I am not very familiar with videos, but would be WAY willing to explore that option.
If you are interested in blogging/writing some articles to make some cash, Please send me an email with a sample of your photography and a sample article. You can pick anything on my website to write a sample article about.
Send your questions and articles to info@mammacandoit.com.
Update: I forgot to mention that I will wait for the articles and not make a decision until May 1st. :)
Friday, April 18, 2014
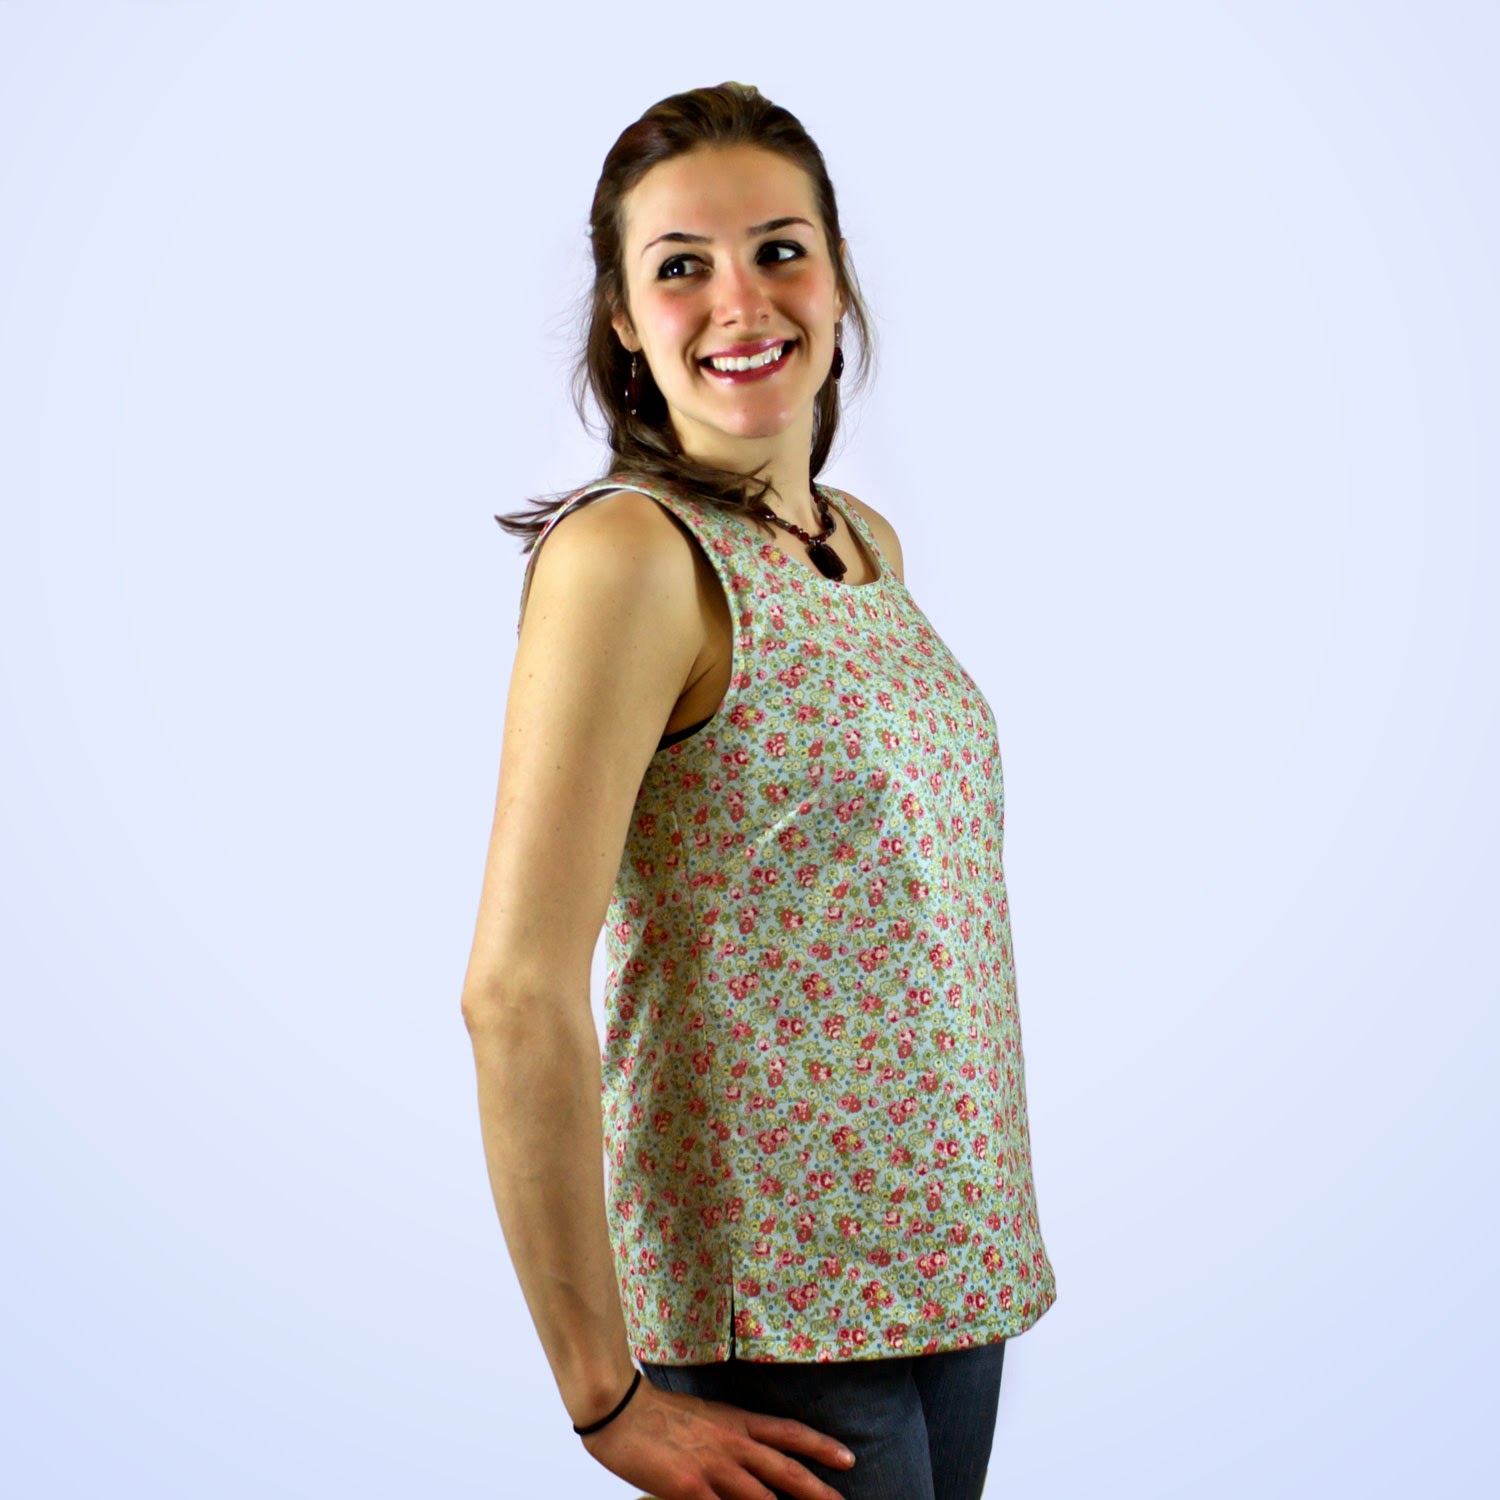
Woven Tank top pattern
This tank top pattern knocks my socks off. I love it. Tank tops are my favorite article of clothing by far. Yet, I always find that I don't have enough of them. What better project than to sew something that I need?
To top that off, I have a generous stash of woven designer fabric that is aching to be used to make something. I will frequently browse the sales on fabric.com or my local quilt shop and pick up a new stash of fabric when I get a creative itch. Then I forget what I bough the fabric for and it sits on my shelf....waiting patiently for the day when it will turn into an article of beautiful creativity.You'll notice that I like to get 1 yard or more, because I know that I might change my mind on the end product....so I'll need extra. Ha! Anyone with me yet?!
So here I am without enough tank tops and a stash of woven fabric that needs some attention. Light bulb moment: I should make a woven tank top pattern! Right? Well that was a great idea until I realized that I had never made anything for WOMEN before that would require sizing. I went to work. I worked and I worked to get the right arm holes, neck lines, dart placements, hip measurements....etc. You name it and it was a task to undertake. After a few attempts, I have the best, pull over woven tank top pattern on the market. It is beautiful.
The second tank top pattern that I designed is very similar to the simple tank top pattern, but it has a bit more class. I call it The Woven Classy Tank Pattern. You can see the Woven Classy Tank Pattern here.
To top that off, I have a generous stash of woven designer fabric that is aching to be used to make something. I will frequently browse the sales on fabric.com or my local quilt shop and pick up a new stash of fabric when I get a creative itch. Then I forget what I bough the fabric for and it sits on my shelf....waiting patiently for the day when it will turn into an article of beautiful creativity.You'll notice that I like to get 1 yard or more, because I know that I might change my mind on the end product....so I'll need extra. Ha! Anyone with me yet?!
![]() |
| A small portion of my fabric stash |
The first tank top pattern that I designed is a simple one. In fact, that's why I named it The Woven Simple Tank Pattern.
You can see the Woven Simple Tank pattern here.
It is incredibly easy and fast to make. I show you step by step on how to finish the neckline and arm holes with bias tape. Don't worry – it's a snap, even for a beginner! The hem sits at the perfect hip length so that if you have wider hips, you don't have to worry about adjusting the sides of the shirt to fit you. The bust fits beautifully with the perfectly placed side darts. My favorite part about the Simple Tank is that it hides the tummy. I have had a few babies and need some extra tummy coverage and this tank top pattern does it for me! Now I can look adorable without worrying about my flab ruining a great outfit!
![]() |
| The Woven Simple Tank Top pattern |
The second tank top pattern that I designed is very similar to the simple tank top pattern, but it has a bit more class. I call it The Woven Classy Tank Pattern. You can see the Woven Classy Tank Pattern here.
The Woven Classy Tank has the same great neckline and bodice, but the length extends a bit more. There are slits on the sides as well for the wider hips. The slits make the tank flow freely. The body is extended, has more curves to it and gives an elongated and curvy torso look. This is my favorite tank pattern. I can wear it in the garden with a pair of capris, I can wear it on date night with a pair of jeans and pumps, or I can even wear it to bed with a pair of shorts.
6. The pattern comes with printable pattern pieces. Print them from your home printer, tape together and cut out your size. Don't ever worry about sizing up or down. They are perfectly sized with real dimensions from real women.
![]() |
| The Woven Classy Tank Top Pattern |
![]() |
| Compare tank top patterns Left is CLASSY - Right is SIMPLE |
Overall this tank top pattern was entirely fun to design. I loved trying them on and making them for friends. I loved the challenge of making clothing for women instead of babies and kids (which has been my specialty until now). I love wearing the clothes that I make!
These tank top patterns include some great features that I want to clarify with my readers.
1. There are no zippers or buttons to worry about. The tank slips on over the head.
2. There are side darts to keep the tank shapely.
3. The neckline is modest. There's nothing that frustrates me more than to find an adorable shirt that I have to wear something under because it's inappropriate on its own. You won't find that issue with this tank top pattern.
4. The arms are perfectly sized to fit, yet without gaping holes that show too much skin. Again, we want to be modest and comfortable.
5. This pattern is sized from 0-20. Don't worry if you don't know your "number". I've included an incredible size chart that helps you determine what size to make.
| A screen capture of the pattern piece with the size chart |
7. You'll never find an easier pattern line than Mamma Can Do It designs. My tutorials all have easy to read instructions with crisp images for each step. I explain everything for beginner level.
8. If you are a beginner and can't wrap your head around the project, I offer help on all projects. I answer all questions within 24 hours (unless it's Sunday) and if you aren't pleased, I'll refund you for the pattern.
Now you know how I feel about my new patterns for women. I'm planning on making a whole collection with this great neckline. I love that I can fit it over my head and yet it's completely appropriate and comfortable. The collection is called, The Victoria Collection. Make sure you check it out on my website from time to time. There will be some swing dresses in the near future!
![]() |
| The Simple Tank Top pattern - The Victoria Collection |
Friday, February 7, 2014
Soaked Whole Wheat, Applesauce, Oatmeal Muffins Recipe
I realize that it's been a while since I've posted any recipes. A busy mom here during awake time and a busy working woman during nap time has got me to where I can't write about both.
However, I have been learning about the value of wholesome cooking/baking and I wanted to share this recipe that I have been working on. It's been a work in progress for ages, so I hope you enjoy it!
Soaked Whole grain, applesauce oatmeal muffins (115 cals each)
Makes 12 muffins
-1 C cooked oatmeal (leftovers) or 1/3 C raw old fashioned oats & 2/3 C milk
-1 C unsweetened applesauce
-1 tsp vanilla
-2 T olive oil or melted coconut oil
-1/4 C milk/whey/buttermilk
-splash of apple cider vinegar
-1 1/2 C whole wheat flour
-1/4 C Raisins (optional)
Mix all ingredients and let them soak for 6-24 hours. The longer, the better.
Then add
-1 T baking soda
-1 T cinnamon
-2 large eggs
-Stevia to taste (Trader Joe's brand is about 1/8 tsp)
Butter muffin tins and bake at 375 until toothpick is almost clean.
Delish alone or smothered in homemade strawberry jam.
Sunday, January 12, 2014
Monday, November 25, 2013
Emma Flower Pattern Tutorial #1
When I put together the Emma Collection, I made a couple flower headbands that I wanted to share the patterns with you! The flower headband pattern is available on my website for free in pdf format. There are printable pattern pieces for the flower pieces as well as an elastic size chart. The free flower headband pattern pdf can be found here.
| Also in the Emma collection are the Fitted baby shirt pattern |
![]() |
| and the Baby Leggings Pattern |
![]() |
| and the long sleeve a line baby dress pattern |
Okay, on to the free flower pattern. :)
| 1. Using Pattern, Cut one circle and one rectangle. The pattern pieces can be found here. |
| 2. Use the hand needle and thread to sew around entire perimeter of the circle piece. Sew each stitch about 1/2” long and about 1/8” from the edge of the fabric. Do not tie the ends of the thread. |
| Another shot of step 2. |
| 3.Pull the ends of the thread to ‘cinch’ the circle into a “puff”. |
| 4. Tie the thread ends together while they are still tightly cinched. |
| 5. Adjust the puff so that the cinched section is on the top center of the puff. |
| 6. Cut one rectangle using pattern piece. Fold in half as shown and sew the open ends together. Knot the ends. |
| 7.Fold the strip inside of itself like above. Make sure that the sewn ends are hidden on the inside. |
| 8. Sew the open edge closed. Sew with 1/2” stitches that are about 1/8” from the edge. Don’t knot the ends. |
| 9. Cut slits on the folded edge. Cut them about 1/2” apart. Be careful not to cut the thread. |
| 10. Pull the threads tight to cinch the strip into a flower. |
| 11. Tie the ends of thread and adjust the flower to lay flat. |
| 12. Place a dab of hot glue onto the center of the “puff”. |
| 13. Place the flower on top of the hot glue. Allow the glue to cool, then sew one or two stitches through both pieces and tie securely. (I’m sorry there isn’t a photo of this). |
| 14. Place a dab of hot glue into the center of the flower. |
| 15. Fold a couple loops (petals) over the hot glue to hide the center. This is optional depending on your preference. |
| 16. If you are making a headband, cut the elastic to appropriate length. Find elastic measurements on pattern piece. The headband measurements can be found here. |
| 17. Overlap the ends of elastic 1/2” and sew them together. |
| 18. Turn the entire piece upside down. Place a strip of glue where the elastic will lay if you are making a headband. |
| 19. Put the elastic on top of the glue. Press it firmly into place. |
| 20. Cut a strip of scrap fabric that is approx 1 x 2”. |
| 21. Carefully place the hot glue onto the elastic strip. Press firmly into place and trim the edges of the scrap piece to fit the head piece. |
![]() |
| Easy peasy free flower pattern. |
Subscribe to:
Posts (Atom)