Showing posts with label recycle. Show all posts

Thursday, November 16, 2017

The Cowl Neck Pullover


It's getting really cold here in Michigan. And we happen to live in the snowbelt, so it's even colder than normal michigan temperatures. My littles have a plethora of summer clothes in their drawers still, but I needed to get something a bit warmer, for fall and winter wearing.
That's when the Cowl Neck Pullover Pattern was created!


The most exciting thing about this pattern is that it was my first pattern that I have had meticulously tested. It was such a fun process and I learned so much!
In the process of testing, I've been learning about new fabrics that are making their way into sewing rooms, and turning out to be favorites. I'm also finding that many fabrics that I thought were the best options, are just a fraction of what's available! I still think that a favorite option of mine is to recycle t-shirts or sweaters into my baby wear....But mostly because I like to be thrifty. :)

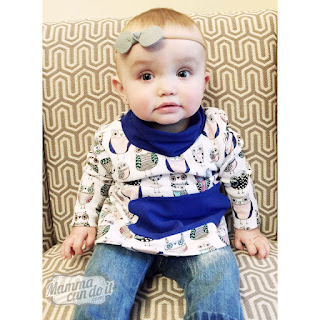
This photo was taken from one of my sweet testers!

Enough about fabric choices, let me tell you about this Baby Shirt Pattern!


When I first started in the designing process, I knew that I wanted something wide enough that you can layer a onesie in, but fitted enough on the sleeves that it didn't hang/drape like a sweatshirt. 
My heart was set on a boy shirt design. You know there aren't enough boy patterns out there!
However, when I originally had my testers on it, they thought it was more of a feminine cut. I was so bummed! It looked great on Elijah, but I could totally see what they were saying.
We decided to do something amazing - and that was when we created a "masculine" AND "feminine" cut to this shirt. That way it is most flattering for boys OR girls. :) 

Masculine cut pullover pattern
Feminine cut pullover pattern
Lets talk about the Cowl. It's Warm. It's cute. It fits perfect over the head. It makes the shirt look so posh and trendy. I love it so.much.
Since I had "BOYS" on my mind when I was creating this shirt, I wanted to make sure that it was a trendy looking cowl that would look great on boys. Nothing floppy that would get in the way while playing legos....but something that would add the warmth and cute factor that this shirt needed. 
I also had the mindset that many boys have larger heads than girls, so I wanted it to easily slip on and off. This design is p.e.r.f.e.c.t. 


 The pocket. Oh the pocket. When I was making my test shirt, I told Elijah what I was doing. I said, "mommy is making you a 'pocket shirt' that you can put things in." He literally stood by me the entire time I sewed this shirt for him. The whole process took me about 20 minutes, and he stood there, using his 2 year old vocabulary to tell me how much he loved pockets, and what kind of things he would be putting in his pocket.
Boys. Love. Pockets. Enough said.

Look how much room Elijah has to put stuff in that pocket!


Look at this great tester photo - He loves his pocket too!

The sizing of this shirt is fantastic. It's sized Newborn to 36 months. Each size fits perfectly. The sleeves are perfectly fitted, but there's room enough in the body to have an under shirt to keep littles extra warm. I have also included an added bonus of a "tiny" size. Look at how tiny the smallest one is! It is perfect for a doll to have a matching shirt!



 Overall, this Cowl Pullover is a new favorite of mine that I am so excited to share with you. It sews up really quick and fits great. I hope that you love it as much as I do.


Tuesday, September 12, 2017

Free Bib Pattern

free bib pattern

Lets face it, keeping baby faces clean is a full time job. Keeping their clothes clean doesn't have to be though. OK, maybe that's not true, cleaning baby clothes is definitely a full time job; but keeping drool and food off of them can be a bit easier. That's where bibs come in.
Baby bibs are really a necessity when it comes to making supplies for our little ones. They can be pretty expensive to purchase, but when you make them yourself, they can cost next to nothing!
Lets get started.


bib patternbib pattern

To begin making baby bibs, you'll need to make a plan. 

Which bibs do you need to make? What phase is your baby in and going to be in soon? Take a look at the checklist below to see what you need to have in your bib arsenal.
  • The Drool Bib
    • 0-6 months (for when your baby is in the drooling phase)
  • The Cereal Bib
    • 4-8 months (for when your baby is starting baby food)
  • The Shoulder Snap Bib
    • 4-8 months (similar to the cereal bib, but snap is on the shoulder)
  • The Dinner Bib
    • 5 months - 4 years (for when your child is eating solid foods)
  • The Spaghetti Bib
    • 4 months - 4 years (A large bib with a snapping pocket for messy meals)

How many bibs do I need to have?

This is a real question that really depends on a few factors. 
First factor is your individual baby. If your baby is a drooler, and you make drool bibs, you might get away with having only one per day. But if your baby drools excessively, you'll want to change the bib 4-5 times a day. 
Second factor is how often are you washing? If you wash your baby's clothing and bedding separately from the rest of the family's, then you might only wash it once a week. In that case, you'll need more bibs than if you wash them with the rest of the family's laundry. 

What's someone to do who doesn't have a baby yet? 
I'd start with making 3 of each type of bib. Once the baby comes, you'll get a better idea of what your needs are. When you reach the stage where you want the baby to start using bibs, you'll have a desire and time to do something at your sewing machine. Don't feel like you need to rush to get it all done before the baby arrives.
bib pattern
5 baby bibs that coordinate make a great baby gift!


How to make baby bibs as a gift?

Making baby bibs as a gift is easy and fun! For a gift, I usually make one of each type. That's a bundle of 5 bibs that goes from birth to 4 years old. If you make the bibs in coordinating colors and fabrics, it is a pleasure to give the gift, and even more of a pleasure to open!


bib pattern

So how do I make a baby bib?

I have a sewing pattern for the baby bibs here
If you want even more of a visual, I have free bib making class with two of my daughters while we made a few of these bibs. View the free bib video below.


Don't forget to get the printable bib sewing pattern for the template and the step by step tutorial.

Happy sewing!


Monday, May 9, 2016

Recycle a t-shirt into a baby shirt

It's so close to summer. My Elijah has been proving to be a terror on his wardrobe. This child wants to play hard so I need to make him some clothes that won't break my heart if he ruins them.

My inner "freak out" is usually associated with expensive clothing, or clothes that take me a while to make. So I am combating that by making him shorts and cut offs out of t-shirts! In fact, I found a new way to whip out my baby cut off t-shirt even faster by recycling the binding of the existing t-shirt. I even made a video for you. :)


**Please know that my tutorial in the baby cut off tank top pattern DOES show you how to properly attach binding to the neckline, as well as finish any edges. This video is simply a pattern adaption to whip out my sweetheart some play clothes. 


Friday, January 1, 2016

Sewing to avoid Human Suffering

I've been struggling with conviction over the things that I buy. Almost everything that we purchase in the USA originates in another country. Just because it's in another country, doesn't necessarily mean it's been in the hands of a slave or person undergoing unfair treatment (Definition: A person or child who is forced to work and/or paid less than what is required by government regulations in any particular country). However, after paying close attention for only a few  "pre-purchases", I am convinced that there is absolutely no way that I can entirely avoid slave labor. This hurts my heart.

Let me give you an example of what I mean. Obviously, if you buy an item from Walmart, it's supplier is more than likely a human suffering factory environment. That's easy. Avoid Walmart.

But here's an un-obvious: Meijer. They claim to be entirely against child labor, slavery, human trafficking etc. They say that their suppliers must adhere to the laws of their country. That sounds good on paper. But what you don't know, is that the countries in which they are purchasing their goods, don't have child labor laws. They don't have laws regarding human trafficking, human suffering, or cruelty. Further, their "supplier" might only be a middle man to hide the tragedy of millions of forced workers.

Lets take it a step deeper. Hanes. An underwear company. They seem A+. They are against human trafficking. They claim that they own 90% of all offshore facilities that make up their clothing. This helps significantly in the process which keeps their products away from human trafficking. They even audit their suppliers as far as their compliance to slavery laws. Hanes statements regarding their supply chain is here. But what about the "un-laws"? AKA The laws that don't exist regarding human suffering? What about the people who are further in the chain? What about the supply chains that they use that have nothing to do with their final products (supplies that they do not have to report)?
Let me break it down with this:
Hanes owns the Apparel Manufacturers. Not the textile companies, nor the individual textile supply chains (dyes, fabric weaving machines etc), not the farms which grow the cotton, nor the pickers of the cotton. Hanes doesn't own the machines or their supply chains which sew the products together, the "business related products" that the company uses (or their supply chains), and doesn't own the thread manufacturer (or their supply chains). Hanes doesn't own the packaging manufacturing supply chains (which is quite extensive), or other multiple facets which make the business work.
Yet, out of all of the companies that I have researched as to WHERE I can buy my underwear, this is the only company that I would buy from. If I had to.

Can I eliminate any of those supply chains? I too have a machine, I use thread, I use fabric, I print patterns on paper, I use my computer, I use scissors, all of which have an extensive supply chain.

Yes. By recycling. I am convinced that if we recycle things that other people have thrown away, that we are not only helping our environment, but we are also helping to eliminate supply chains that are filled with billions of people who are treated unfairly. I do not want to support the people who are treating others that way.
So what can the average person do? Purchase fabric from other people's stashes (think etsy or ebay), purchase used items like scissors, sewing machines, etc.

Buy patterns from work at home moms or download only options. Once you download and print, save the pattern so that you don't have to print again and again. I've seen some very good ways to store them like this:
Roll them up and slip a toilet paper roll around them

After they are rolled up, label them and put them in a box

Hang them up

But I think the biggest way that you can prevent human trafficking and help others at the same time:
Shop at Salvation Army or other non-profits who help others.
Salvation army uses other people's cast offs to raise money to help others

I know, I know. I can't imagine wearing someone else's underwear. But you CAN pick up some tshirts, or dresses that you can recycle into multiple pairs of underwear if you sew them yourself. 
It cuts down on the supply chain, AND helps people in the process. **And I'm not going to lie, making them yourself is so much cheaper, your checkbook will thank you for it too.

All of that convenience that you are paying for by buying the underwear at Hanes, is actually a multitude of lives that you could be:
a) Helping through buying from salvation army OR 
b) Using their pain so that you can get something conveniently.

This entire blog post is part of my heart that I am struggling with. It's not exactly a high importance in our society, and it's not something that many crafty people want to read or hear. In fact, the few readers that I do have might even be offended. But my business is called Mamma Can Do It. And since God has given me this conviction, my goal is to help change the world as much as I can. Because "I can do it". 
I would love if some of you joined me in this way to change what our families can, and to teach our children the importance of these precious lives.


Thursday, December 31, 2015

Updating a tired room into an office

I am on my way to make something amazing. At least I hope so. My office. Sewing room, craft room, office, studio, whatever you want to call it.
We moved to our new home in August and I left behind my pinterest haven, beautifully crisp, clean, bright, cheery, happy office. However, I got the best place in our new house to make my own. It's large (10x19 in fact!), It's attached to a play area (what could be better than creating while my babies play?!), it's in a quiet part of the house, and there's even the beautiful woodstove/fireplace in the large room. The room is in the basement so it's cool in the summer and warm in the winter. What could be better?
Eh hem. It's dark 70's wood paneling. It's dreary. It smells musty and there's yucky carpet.  There's nothing to separate my space from the flood of toys (which desperately need organization), and with all those things combined, it takes all wind out of my sails. I have no inspiration or desire to be in the sewing room at.all.
I did my very best to take a photo that would show you my distaste for this area. The lighting shadows show the accurate depiction of this space.

After a long talk and look at the budget, we decided that my sewing room was our next room to tackle in our outdated, but very fun to remodel home. However, as I put together my supply list, even with using reclaimed items, the price kept climbing and climbing until it was at almost $600 for this room remodel. For some, I'm sure that is nothing....but my business is meant to help my family - not be a dent in the budget. This will be something to come back to.

For now, I decided to draw up a plan of my favorite way that I could use this spot. I spent some time last night making up a plan of how I thought this space should look.

Today was the first day on remodeling my office. I decided that since I share this large space with the play area, that I wasn't willing to eliminate the entire space for the children. To fix that problem, I would have to start by doing a portion of my space at a time. I very well might nix this idea, but for today, that's what I'm thinking. 

Step 1. assess the room as it is. 
What was once a nice desk needs updating or a new home


I love these built ins, but I think that I put them in the wrong place

This is a painted metal desk. It's in good shape but I think that I want something fresh.

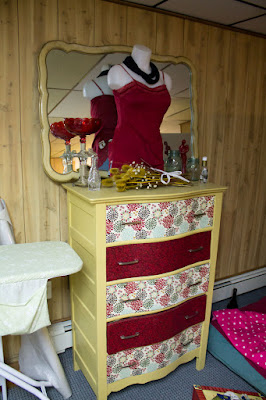
This was the first piece of furniture that I ever redid. I love it. But I think that I'm going with bright, neutral white/gray scheme. I might include some vintage jar blue, but the yellows and reds aren't invited back. I will miss this piece, but maybe I can catch a good price that will help pay for my space!

My studio backdrop has been used to hide my college student, sister's, blow up mattress while she is on Christmas break. I think I'm going to move her to the couch so that I can start my process.


Step 2: Clean out the easiest part of the room. 
I figured that the easiest part would be to move out my sister from my space and take down the backdrop. It was easy and hardly takes up any space in the rest of the room where I am storing it. 
I also decided to list the dresser for sale on facebook. We have a "buy sell trade" page in our area. I love it. 


Step 3: I put other things away in the rest of the space so that I could get a good look at what I had left. At the very least, I shoved all the fabric pieces and nick-knacks into safer places.


Step 4. Reasses my assets.
As I was putting things away, I was reminded about my conscious effort to waste less and to reuse. I keep looking at this tired old desk and metal table. 

I think some paint can do this one good and I might be able to use it in a different way or place. Get rid of that fake, laminate wood grain.

This metal table is in pristine condition. I had gotten it from a junk pile 8 years ago. I don't know what those people were thinking when they threw it away. It was an ugly wood grain as well, but a few coats of paint later it was beautiful. I might have to repaint this baby again too. 


Step 5: Consider saving money in any area that I can.
I started to think about the 1/2 wall that I wanted to build to separate the living space from my work space. It was then that I noticed these shelves. They were one large shelf that was built in a different room in this house. I used my husband's handy sawzall and quickly cut them in half so that I could use them in a different place for these toys. But as I was looking at them today, I wondered if I could put a back on them and use them like a floating wall for my sewing room. I am going to think about this some more. It would significantly reduce my costs.


Step 6: Consider a new layout
As I was thinking about saving money and re-using the furniture that I already had, I thought that I needed to redo my layout of the room. But then I pretended that I was sitting in the corner where I had planned on putting my sewing table. hmmm....not exactly what I had in mind. I think I would hate sitting up against the wall to sew. New idea.  **At the very least, I would need to put a gigantic mirror on that wall to bounce light and "life" from if I ended up in the corner.

So what about you? Do you think I can reuse those shelves? Do you like to breathe new life into old things?