Showing posts with label Homestead. Show all posts

Monday, November 11, 2013

How to make chicken feet broth

I love to eat. My kids love to eat, and so does my husband. We eat very well for a family of 8. In fact, I will quite often make meals that are so huge that I have to find families to give dinners to. One of the reasons that we eat so well is because God has blessed me with a mother who'll try almost anything. I have learned well from her. Since my husband is also great at trying anything, I am always open to new ideas. My latest attempt at trying something is sure to be one that I will repeat: Making stock from chicken feet. I know that the first thought is “OH MY GOSH, REALLY!?!!?”, but when you get past that, it's smooth sailing.
cook chicken feet!
Claire is one happy and well fed baby!
I raise my own chickens and butcher them myself. I have read that chicken feet are the 'greatest thing for broth', but because I was unclear on how to clean them, I threw them in the carcass pile. When you butcher 25-30 chickens at a time, that's a lot of chicken feet that could be saved, yet because of my uneducatedness, I simply tossed them to the coyotes.
My best friend helping me butcher chickens in 2013

Chicken feet are very high in chondroiton and gelatin. If you have any joint pain or arthritis, you KNOW what I am talking about. This is for you.

I will typically make one to two chickens on an average week. Each chicken gets about 3 meals out of it.
  • Day one I will roast the chicken or put it into the crock pot. That night, I will cook the bones ALL NIGHT (maybe throw in a neck, or a carcass that I saved in the freezer too) in the crockpot. In the morning I have a delicious stock that I save in the fridge. 
  • Day two: I make some sort of chicken soup or meal with the stock. You can use chicken stock more ways than you think. Did you know that chicken stock in grits with garlic and thyme make the most delicious 'breakfast for dinner' that you ever had? Just had that for dinner tonight. mmmm, I wish there were leftovers. 
  • Day three: I use the left over chicken pieces from day 1 to make something like a pot pie (great for left over potato soup from day 2) or chicken Alfredo, or chicken salad sandwiches.

Of all of these three days, I still end up wishing that I had more stock. If you have to add water to a base (stir fry, soup of any kind, scrambled eggs, etc), you should be adding stock. It makes the most incredible food that you can put into your mouth. Not only good tasting food, but highly nutritious as well.
Recently, I had a friend talking about how she had multiple bags of chicken feet to make stock out of. I had already read that they were awesome for that purpose, and when she expanded on the subject, I KNEW that I needed to try it. When she saw that I was interested, she gladly gave me 10 lbs of chicken feet. TEN POUNDS! I thawed them and quickly went to work.
These chicken feet were directly from the butcher that she takes her home-grown chickens to. Since I butcher my own, I will have the extra step of blanching them first to do anything with, but I wanted to share my first experience with you.
Since there were 10 lbs, I decided to make the chicken feet in two separate batches of stock. The first batch went right into the pot. The second batch I baked for an hour and added vegetables and seasoning to.
The first batch that went into the pot turned out to be okay. It was rich tasting, but it smelled terrible. I was expecting it though. I don't know if you have ever cooked a chicken all night without seasoning....you wake up to a dreadful smelling meat. I hate it. I almost always add a bay leaf and celery to my chicken bones when I cook them all night to avoid the scent.
The nice thing about the first batch was that it was quicker to get into the pot.

The first thing that I did was thaw the chicken feet. Then I set up my working station.

From left to right: Junk Container, Cleaned chicken feet bowl, un-cleaned chicken feet

If I was going to butcher my own chickens and start from the beginning, I would pile all of the chicken feet into a 5 gallon bucket. Then I would pour boiling water over them. I would put in dish soap and stir. Once it was cooled enough to touch, I would take one foot at a time and peel the yellow skin off of each foot. At that point, I would rinse them and freeze them until a later date.

Since these ones came from the butcher though, the chicken feet are almost cleaned off already.
Each chicken foot has a soft pad at the bottom. For some reason, this pad gets a bit gnarly at times. If it's gnarly, take a sharp knife and slice part of the pad off to cut off the offending gnarliness. Put the nasty part in the “junk container”.


The next step is the toenails. I have read mixed things about them. Some people say “why not leave them on if you are going to strain it later anyways?”. Other people say, “cut the nails off and open up the cartilage at the same time for a more wholesome broth”. I went with the latter and chopped them off. This was the hardest part for me. Not only was it a daunting task until I got the hang of it, but the chicken feet resemble human hands too much. I might skip this step in the future.This was not an easy task until I figured out the best way. When slicing off the end of each toe, simply cut at an angle, just beneath the toe nail. This will keep your blade sharp and will go faster than chopping through any bones. Put the toenails in the “junk container”.


Put all of the chicken feet into a large bowl and rinse. Rinse. RINSE.


At this point was where I deviated both times. The first time, I simply put the feet into the pot.
Place the chicken feet in a large pot. I am using my pressure canner/cooker for this. Mine is a Presto 23 quart canner. I love it. It is aluminum and although I was worried at first about cooking in it, I am moving past that. Place the bottom rack inside, put the chicken feet on top and fill with clean water until the canner is 2/3 full.


The second time, I put the feet on a cookie sheet and placed them in the oven at 350 degrees. I baked them for an hour.

Overall, I liked the flavor better of the ones that went into the oven to bake. The broth also has more color and seems to be richer. I will probably do this method more than "straight pot" chicken feet method.


Bake those chocken feet for about an hour at 350 degrees. It will smell like a roasting chicken. Pull the legs out after an hour. The color will be slightly browned and the skin will look translucent. Chicken fat will also be on the cookie sheet (rather than in your stock...woot!).


Place the chicken legs into the pressure canner/cooker. Add an onion or two, celery, bay leaf and thyme. Also add a few tablespoons of vinegar. Vinegar will pull out more calcium from the chicken bones and put it into the stock. Put the lid on and place the regulator cap on your pressure canner/cooker. 
Turn heat to high and keep watch.


When the pressure gets up to 15 lbs, hold it there for 15-20 minutes. I have seen other recipes that say to cook at 15 lbs of pressure for 10 minutes. I personally like to a little bit longer. Just because.


After 15-20 minutes, shut off the heat. Wait until the pressure canner completely de-pressurizes before touching. When you remove the lid, this is what the stock will look like. I have seen that some people remove the top layer of fat....and some people keep it. It's personal preference. Do skim the scum off of the top though. It is full of impurities that you don't want in your stock. 


Strain the stock and put into freezer bags when it is cooled. You can also can this stock easily by following your pressure canner directions. Only can meat products with a pressure canner to manufacturer directions. NEVER try to wing it. *Ha ha...wing it.....or 'foot' it*.
I hope that you enjoyed this tutorial! Thanks for joining me!

Saturday, October 5, 2013

How to make a homemade boot dryer

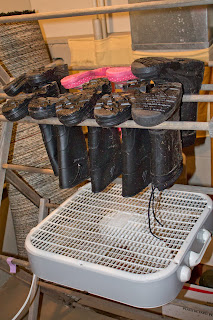
I have 6 children, a husband and myself who wears boots. So I decided to make a homemade boot dryer!
I don't own a conventional boot dryer.  Not only because one would not be enough to dry our boots, but also because I simply cannot afford 8 boot dryers. At about $40 a piece, I would be spending a heck of a lot.
boot dryer that holds 20 boots

Today is Saturday and it is raining. All of my kids were disappointed to be inside this morning, so when I suggested that they play in the rain, they jumped at the chance! On went the puddle jumpers and play clothes. When the finally came in, they were soaked to the bone, including the insides of their rubber boots. How will I get them dry before tomorrow?
So I came up with this idea for a homemade boot dryer! It is really simple. Most people who have large families, probably already have these items in their houses!

I have a large clothes drying rack that I bought at our local Amish store. I think I paid $30 for it, but I'm sure that you can get one for cheaper if you are looking at using it strictly for boots.
Second, is a box fan.

Open the clothes drying rack so that the boots can sit upside down between the dowels. Place the box fan on top of two dowels to create a 'shelf'. Aim the air going upwards into the boots.
Turn on high and walk away for a couple hours. As you can see, I have 6 pair of boots on this rack,but could easily fit another 8 pair, for a total of 14 pair. I'd like to see someone buy 14 boot dryers. :)

That's all! So next time that your kids want to jump in the puddles, don't fear - you'll get those boots dry in no time!


Saturday, March 9, 2013

Baby Pants Pattern - nb-24 months - Cloth & disposable sizes!

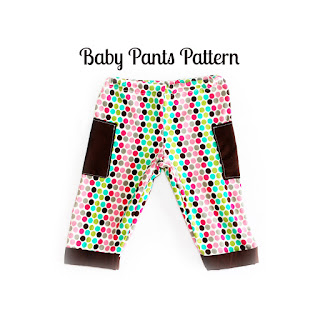
I'm just going to take a minute to talk about my baby pants pattern. It rocks. Not only does it sport multiple sizes, but there are two versions! One version is for cloth diaper wearers and another is for disposable wearers. To download the baby pants pattern, Click here.
baby pants pattern
Printable sizes included are:
NB
0-3 Month
3-6 Month
6-12 Month
12-18 Month
18-24 Month
baby pants pattern

So out of all the baby pants patterns out there, why would you want to spend $5 to get mine? I'll outline the list below.


  1. My baby pants tutorial is incredibly easy to follow.
  2. My baby pants pattern is perfectly sized for newborn sizes up to 24 months. No guessing or measuring. 
  3. This baby pants pattern has special sizes for cloth diapers or disposable diapers!
  4. My baby pants pattern has real elastic measurements. No measuring (during naptime) required! :)
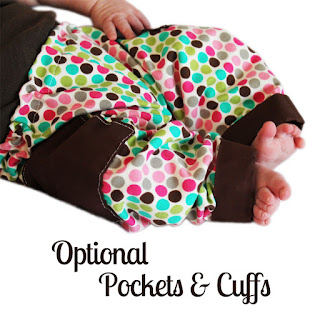
  5. This baby pants pattern has optional directions to make pockets & a cuffed hem.
  6. This baby pants tutorial has directions to use a serger OR a sewing machine. 

baby pants pattern


Ok, no more outline. lets get to the facts.


1. My baby pants tutorial is incredibly easy to follow

Here is an example snapshot. This says enough I think. Super easy directions with very explicit description with each image. Even the index is easy to maneuver through.:


2. My baby pants pattern is perfectly sized

If you have been sewing very long (especially baby patterns), then you know that baby patterns are absolutely NOT sized correctly. However, I have taken special care to be sure that all of my patterns are sized for real babies. Perfectly. This pattern is no exception. 

3. Cloth or disposable diapers?

Along with each pattern being incredibly shaped for a real baby, I also have it designed for two different specifications. One is for a cloth diapered baby (a bit more bulk) and one is for disposable diapered baby. The difference.....COMFY or SLIM versions. :) You are going to love this! 

4. Real elastic measurements

I'm not going to lie....to see what I was up against, I bought a pants pattern online. Do you know what I found? I discovered that I needed to measure my baby's waist to determine the size! Yeah...since I'm doing this project at nap time, and you are too....I think it's best that I have accurate size measurements in my pattern & tutorial. I do....they are the conventional waist sizes that you dress your baby in on a regular basis!

5. Optional Pockets or Cuff

Does a newborn baby NEED pockets on her pants? Nope...but they are dang cute! So is the cuff! I just wanted to give you the option of a bit more flair. Don't worry, if you are looking for ruffles...I'll be posting another pants pattern within the next few weeks with a ruffled butt & leg. You'll love it. But for now, the cuff rocks my socks!

baby pants pattern


6. Conventional machine or serger

This tutorial has instructions for a conventional sewing machine or a serger. If you have a zig-zag stitch, you can do everything that the serger does according to my directions. If not - don't worry! These steps are optional!


Overall, I think you will be incredibly pleased with this baby pants pattern. It is very easy to follow and you'll get a perfect pair of baby pants the first time. Even if you are a first time sewer. 
For whatever reason, if you are dissatisfied with this pattern, I have 100% refund guarantee  You'll love this pattern or your money back. 
I just know it's going to be a 'go to' pattern for you. Go ahead and download the basic baby pants pattern today!


Sunday, February 3, 2013

Swaddling Blanket Pattern - Finally a solution to no sleep!!

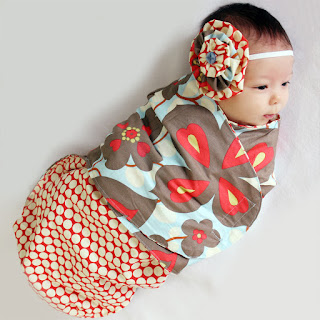
Will a swaddling blanket pattern save your life? Yes - if you have a baby! Make your own perfect swaddling blanket with my swaddling blanket pattern! It has a front pocket for baby's legs, velcro tabs on the wings, and it fits any baby perfectly from newborn to 12 months!
swaddling blanket pattern


Have you ever tried to swaddle an angry baby at 2am? I have. It's terrible - first you can't get the screaming baby's arms down which make it impossible to wrap comfortably. When the arms stop flaring, the baby is kicking the blanket down. When your struggling has finally got the baby wrapped up, you realize that you should have changed her diaper. Start all over. This was my life - until I designed the swaddling blanket pattern.

This swaddling blanket has a front pocket that you place your baby into - screaming - kicking - flailing...it doesn't matter because the baby will still go into the pocket. Once the baby is in the swaddler pocket simply wrap the wings over your baby and touch tape them into place. VOILA you have a PERFECTLY swaddled baby in 3 seconds who is already showing signs of cheering up!

swaddle blanket pattern

So why should you buy this swaddling blanket pattern over any other? Because this one is the best. :)
Seriously. Not only are there 33 colorful and crystal clear images to guide you in this sewing experience, but the detailed descriptions rock. The pattern pieces fit together perfectly and go together in a snap.
The velcro strips are in the absolutely perfect locations for adjustability. Like I said, this fits babies from nb-12 months so there has to be adjustability.
The shoulder area is contoured to fit your baby. It really does fit nice and tight without you worrying about bulk by the face.
Even the foot area of the front pocket has 'comfort darts' that allow extra room for baby's feet.

swaddling blanket pattern
This swaddling blanket pattern is certainly the best one available. 
I want you to be happy with your purchase of this pattern. In fact, if it's not everything that you hope it will be, I'll give you $ back! Yup - I'm so confident that you will absolutely love this swaddling blanket pattern, that if you don't like it, I'll give you 100% refund. 
swaddle blanket tutorial

So try it today! There's nothing to lose! Click here to go to the swaddling blanket pattern


Friday, January 18, 2013

Crib Sheet Pattern - Perfect fit this time!

Recently I wanted to make crib sheets for my baby. I tried different patterns and not one of them fit right. So of course I decided to take matters into my own hands and make a crib sheet sewing pattern for myself and my customers. Of course crib sheets double as toddler bed sheets. But what about a toddler bed flat sheet? You got it! I have also made a toddler bed sheet pattern that includes fitted and flat sheets.
Want to check it out? See my Crib Sheet Pattern and let me know what you think!
toddler flat and fitted sheet pattern

This pattern fits all standard crib mattresses. A standard crib mattress is 51-52" x 27.5" x 5-6". Measure your mattress - I bet you have a standard size.

crib or toddler sheet pattern
This crib sheet pattern comes with directions to make crib sheets out of many types of fabric. I have quite a few fabric ideas on the tutorial. Don't worry though...I won't make you find some outrageously wide fabric - it uses regular widths! You can make a crib sheet with standard 44/45" wide designer fabrics, broadcloth, flannel or even 60" wide minky or fleece fabric.

how to make crib sheets

Speaking of fleece: Have you ever heard of sewing FLEECE CRIB SHEETS? Oh...these are the most wonderful thing. They are not only incredibly soft, but fleece crib sheets draw moisture away from your baby's face. This helps to keep tears, spit up, or drool off of your baby's cheeks so that rashes don't appear. As a mom of 6, I have had my fair share of rashes and fleece sheets were the only thing that kept them dry. Use this crib sheet sewing pattern to make fleece crib sheets for your baby!

fleece crib sheet pattern

Are you in a financial crunch with a baby coming due soon...or are you trying to save money by making your own crib sheets? If making crib sheets cheaply is what you are going for, I have a few money saving tips in the tutorial as well! Heck, you can match your decor too with these money saving tips! These tips not only help you save money, but give you great ideas on how to recycle things that you wouldn't have thought of otherwise. Almost all of my patterns have 'budget friendly' ideas which include cheap places to buy fabric for the project, where to get fabric for free, where to get fabric to recycle..etc. The thing that irritates me most about sewing things for myself is that sometimes it can cost more then buying...so I like to find ways to stay considerate of mine and my customers budgets. Use this crib sheet sewing pattern to save yourself some money!
sew crib sheets
I don't require my customers to do any 'figuring' with any of my patterns. The measurements & directions are laid out very clearly so there isn't any guessing. All of my patterns, including this crib sheet pattern, also come with step by step directions with VERY clear images on how to do that step. Each step has AT LEAST one image. You don't need to guess or spend time trying to figure something out...I have it figured out for you.

how to sew crib sheets

This pattern & tutorial comes with a printable pattern piece. All of my tutorials and patterns are pdf files which can be printed on a home printer using standard 8.5 x 11" paper. The pattern pieces require NO SCALING as they are already made to size. 

This crib sheet pattern is incredibly easy! Try it today!

Thursday, October 18, 2012

How to skin a chicken

This week has been chicken butchering week for me. Unlike most people who leave the skin on and pluck feathers, I skin the chickens that I butcher. It is so much less messy in my opinion. I also tend to remove the skin before cooking, so it saves an extra step in the kitchen by processing this way.
how to butcher a chicken
Time for the freezer Mr Cluck!
If there had been another adult around that could have taken pictures for me, I would have done it for my readers, but unfortunately there was just me and my youngest (3 yrs). However, please read and imagine. :) You can butcher a chicken in 10 minutes this way with very little clean up.
I think many people can benefit from a step by step tutorial on how to skin a chicken. Here goes.

Supplies:
A trash can
Two 'nooses' hung in different locations
A very sharp knife
A dunking bucket (for wetting chicken feathers after killing)
A clean bucket (for putting processed chickens in)
A hose with clean running water.

Step 1.
I have tried taking the chicken food away at least 12 hours before butchering. I DO find that it makes a difference. I prefer to take the food away early so that I do not have to deal with food in the chicken's crop.

Step 2.
Hang chicken by the feet in one of the 'nooses'. I like to use a slip knot as I find less chickens wriggle free this way.

Step 3.
Cut the head off of the chicken. Leave most of the neck in tact. You'll want to step back for this or you'll have blood all over you. It's important when hanging the chicken noose that you put it in a location that is where the chicken can flap it's wings without hitting something (like a tree trunk) - the wings will break otherwise.

Step 4.
Once the nerves are done moving and the chicken is done bleeding, remove the feet from the noose and dunk in a bucket full of water. Wetting the feathers makes the skinning process much easier as the feathers won't stick to your hands.
Step 5.
Tear the skin away from the neck of the chicken and hang the neck by a slip knot noose. Make sure the noose is very tight as the neck is usually pretty slippery. By hanging it by the neck instead of feet, you'll have much less of a change of contamination.
Step 6. 
Place the garbage can directly underneath the chicken you are about to process.
Step 7. 
Cut off chicken feet and wing tips. 

Step 8. 
Using the knife, start at the shoulder area and gently peel or tear the skin away from the shoulders. The crop is attached to the right breast, so be careful not to puncture or there will be a bit of a mess. Once crop and skin are detached, you can safely pull and tear skin right off of chicken. I pull it all away until it is all hanging at the 'butt' end of the chicken. 
Step 9.
Very carefully slit the cavity open at the bottom. Reach in side and pull everything out. Don't forget to scrape out lungs (easily done with a fingernail). When this is finished, there should only be the bowels attached at the base of the chicken.

Step 10. 
Turn the chicken with the back facing you and cut the entire 'butt' end off. Including the tail. 
Step 11.
Use hose to spray off the chicken inside and out.
Step 12. 
Cut off chicken's neck if desired. Then place inside the clean bucket. Fill with water.
Repeat!
When we are finished with all of the chickens, I take them into the house to bag and freeze. you can fit about 4-5 chickens in a clean 5 gallon bucket. If you have someone to take them inside for you while you butcher, then only one or two buckets are necessary. Otherwise, get enough buckets to finish your flock so you don't have to stop.

Someday I hope to get pictures for this chicken skinning and butchering process, but unfortunately, this year's butchering is done. Hopefully you will have learned something!