We moved to our new home in August and I left behind my pinterest haven, beautifully crisp, clean, bright, cheery, happy office. However, I got the best place in our new house to make my own. It's large (10x19 in fact!), It's attached to a play area (what could be better than creating while my babies play?!), it's in a quiet part of the house, and there's even the beautiful woodstove/fireplace in the large room. The room is in the basement so it's cool in the summer and warm in the winter. What could be better?
Eh hem. It's dark 70's wood paneling. It's dreary. It smells musty and there's yucky carpet. There's nothing to separate my space from the flood of toys (which desperately need organization), and with all those things combined, it takes all wind out of my sails. I have no inspiration or desire to be in the sewing room at.all.
I did my very best to take a photo that would show you my distaste for this area. The lighting shadows show the accurate depiction of this space.
For now, I decided to draw up a plan of my favorite way that I could use this spot. I spent some time last night making up a plan of how I thought this space should look.
Today was the first day on remodeling my office. I decided that since I share this large space with the play area, that I wasn't willing to eliminate the entire space for the children. To fix that problem, I would have to start by doing a portion of my space at a time. I very well might nix this idea, but for today, that's what I'm thinking.
Step 1. assess the room as it is.
What was once a nice desk needs updating or a new home
I love these built ins, but I think that I put them in the wrong place
This is a painted metal desk. It's in good shape but I think that I want something fresh.
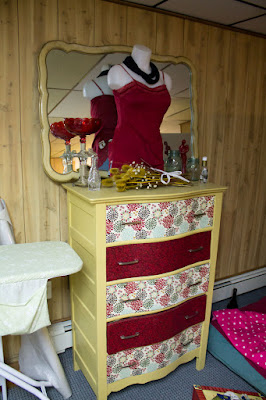
This was the first piece of furniture that I ever redid. I love it. But I think that I'm going with bright, neutral white/gray scheme. I might include some vintage jar blue, but the yellows and reds aren't invited back. I will miss this piece, but maybe I can catch a good price that will help pay for my space!
My studio backdrop has been used to hide my college student, sister's, blow up mattress while she is on Christmas break. I think I'm going to move her to the couch so that I can start my process.
Step 2: Clean out the easiest part of the room.
I figured that the easiest part would be to move out my sister from my space and take down the backdrop. It was easy and hardly takes up any space in the rest of the room where I am storing it.
I also decided to list the dresser for sale on facebook. We have a "buy sell trade" page in our area. I love it.
Step 3: I put other things away in the rest of the space so that I could get a good look at what I had left. At the very least, I shoved all the fabric pieces and nick-knacks into safer places.
Step 4. Reasses my assets.
As I was putting things away, I was reminded about my conscious effort to waste less and to reuse. I keep looking at this tired old desk and metal table.
I think some paint can do this one good and I might be able to use it in a different way or place. Get rid of that fake, laminate wood grain.
This metal table is in pristine condition. I had gotten it from a junk pile 8 years ago. I don't know what those people were thinking when they threw it away. It was an ugly wood grain as well, but a few coats of paint later it was beautiful. I might have to repaint this baby again too.
Step 5: Consider saving money in any area that I can.
I started to think about the 1/2 wall that I wanted to build to separate the living space from my work space. It was then that I noticed these shelves. They were one large shelf that was built in a different room in this house. I used my husband's handy sawzall and quickly cut them in half so that I could use them in a different place for these toys. But as I was looking at them today, I wondered if I could put a back on them and use them like a floating wall for my sewing room. I am going to think about this some more. It would significantly reduce my costs.
Step 6: Consider a new layout
As I was thinking about saving money and re-using the furniture that I already had, I thought that I needed to redo my layout of the room. But then I pretended that I was sitting in the corner where I had planned on putting my sewing table. hmmm....not exactly what I had in mind. I think I would hate sitting up against the wall to sew. New idea. **At the very least, I would need to put a gigantic mirror on that wall to bounce light and "life" from if I ended up in the corner.
So what about you? Do you think I can reuse those shelves? Do you like to breathe new life into old things?


