Monday, March 28, 2016

Maternity Shirt Pattern | Ruched Sides

Since the knowledge of my current pregnancy, I've been looking for and haven't been able to find many maternity shirt patterns. Much less ones that don't look 'tentish'. Lucky for me, I love to design! So I created a fantastic ruched maternity shirt pattern.
When I started this design, I knew that I wanted the ruching to only be in the front. I don't want every angle of me to look pregnant, and ruching in the back is really unnecessary.
To see the maternity shirt pattern for yourself, click here.

maternity shirt pattern
This was one of my favorite maternity shirts in the design process. I adjusted the shoulders significantly though, so it looks better as a tank.

When I initially started the design, I thought that I wanted to go with "tank only", without worrying about sleeves. I quickly discovered though, that my customers WANT sleeves....and so do I. But the shape of the shirt had to accommodate both. I wanted short sleeves, 3/4 sleeves, long sleeves and tank options. And I got the perfect fit of all of them!

maternity shirt pattern
This is my favorite one so far! It features the fantastic ruching and perfectly fitting short sleeves.
Another feature that I wanted to have in this pattern, was the ability to be beautiful from "just showing" to 40 weeks. It never fails that my shirts don't fit at the end of my pregnancies, and I know there are other mammas who have the same issue. I needed length and room.
Bam! Mission accomplished!

maternity shirt pattern
This maternity shirt pattern fits and flatters a "just showing" tummy to "late in the game" and as you can see, there's still quite a bit of room under that belly for more growth!

maternity shirt pattern
Here's another shot of the difference between the two belly shots! It's classy and cute, regardless of how large that belly is!


I always feel like a tank when I'm pregnant, so classy looks and form fitting shirts is important to me. When I first started this design, it took me many many attempts before I finally had a great fitting bodice AND belly. This maternity shirt design is made perfectly for the mamma who doesn't want to wear a tent, but doesn't want skin tight clothing either!
maternity shirt pattern
Even at the "large" belly stage, there is still plenty of room to wiggle and not feel skin tight.

Excuse my 'backside' photo below, but I wanted to show you that the back of me doesn't look pregnant at all! I love this design!
back of maternity shirt pattern
Un-maternity looking backside


This maternity shirt pattern is so easy. The ruching instructions and technique is incredibly simple, yet perfectly effective!
front ruching maternity shirt pattern
example of ruching sides


only in front ruching
example of ruching sides
 Another feature that I thought was important is the neckline of my maternity shirt pattern. I wanted something that was feminine and classy, yet nothing that went too low. I have other babies that I'm constantly chasing, and I don't want to feel like I'm "hanging out" when I bend over. This neckline is perfect for keeping the 'girls' tucked in. Because of the extra room from the ruching and the extra length, large tummies don't pull the neckline down. It's perfect where it is!


late pregnancy maternity shirt pattern

The last thing that I wanted to do with this design, was make it easy to recycle other pieces of clothing or fabrics into this shirt. I love to recycle from the thrift store, or make something unique out of something ordinary. In the maternity shirt tutorial, you will find many ideas to recycle things to help save money and our environment.


early pregnancy shirt pattern
Barely pregnant, but still needing belly room
I hope you enjoyed this walk through of my maternity shirt pattern. Whenever I start a design, I have clear objectives of what I want. To make any pattern accommodate those objectives is important to me, because I design for myself! Then, when I love the design, I share it with you! What a fun opportunity it is to teach you and encourage you to make your own clothes. 


pregnancy shirt pattern
Barely pregnant, but still needing belly room

Thursday, March 24, 2016

Do I need a serger to sew clothes?

I am sometimes asked if you need a serger to sew clothes. Specifically knit clothes. Knits are the stretchy fabrics that can give you a harder time if you don't know how to use them.
I love using my overlock/serger for sewing with knits. I love that it cuts the edge for me, making it completely clean, without any excess seam allowances. I really appreciate using it when I'm sewing over bulky fabrics that my sewing machine would 'cry' about. I like that it doesn't stretch my knits unless I want it to (there's settings for that). There are so many options available on amazon.
It takes a learning curve to use a serger though, and there might be a few garments that are ruined in the process. You can't tear out overlock stitches, and the cutter, while wonderful, is also your enemy if you turn your fabric incorrectly. The other thing that is entirely terrible about an overlock machine, is the threading. There are times when I feel like I waist an hour, simply fiddling with the thread or tension.
Do I need a serger to sew clothes?
To answer the question, "do I need a serger to sew clothes?", the answer is absolutely not. Any of my patterns that you CAN use a serger with, you can also use a regular sewing machine. The trick is the stitches that you use. A serger's stitches will have give or stretch to it. Which is perfect for knits. However, a straight stitch on a sewing machine will not stretch at all. This is easily fixed by simply switching the setting on your standard sewing machine to a zig-zag stitch or elastic stitch. Both of which will have plenty of give/stretch for a knit fabric.
do I need a serger for clothes?

I also notice that whenever I sew a knit fabric with a standard sewing machine, I get puckers. These are normal and easily fixed. Simply press your fabric with a hot iron, or as hot as the fabric will allow. This seems to allow the fabric and thread to shrink back/stretch to the new dimensions that you gave it by sewing. It works like a charm almost every time.

Tuesday, March 22, 2016

Where do I buy PUL fabric

An email that I get frequently is, "Where do I buy PUL fabric". People are always worried about making cloth diapers because PUL fabric isn't something they have ever worked with. The biggest fear though is, "Can I buy it in my local fabric store?". Not usually.
one size diaper pattern
Some fabric stores have a dedicated cloth diaper section, which is becoming more frequent since the boom of "going green". However, it's usually best to buy online to make sure that you are buying from a credible source, and one that has tested their PUL to last for many washings. It's possible that JoAnn.com has PUL, but more than likely (from rumors that I've heard), it will not stand up to rigorous cloth diaper wearing and washing routine.
cloth diaper pattern

The very best place that I have found to purchase PUL fabric is http://www.diapersewingsupplies.com/. They are professional and friendly if you call and have questions. They give you multiple ideas and sewing tips on the phone or email as well. My orders always get shipped the next day after I place my order and I am always pleased with the product.
cloth diaper pattern


I give you many tips in my sewing patterns on how you can easily use it for your cloth diapers or sandwich bags....but they also give you many more tips on using cloth diaper fabrics.

So there you have it! That is where you buy PUL fabric. Now get yourself an awesome diaper pattern and make some new fluff for your baby!
Cloth diaper pattern


Monday, March 21, 2016

Maternity tank pattern designing process

Today I had a fun time working on a new maternity tank top pattern. It's really coming along! I love the bodice fit and neckline. Here's a picture that I took on the mannequin.

maternity shirt pattern

This fabric that I got was on the clearance rack for $3 per yard. This maternity tank uses less than a yard of fabric to make! Yes....I am totally making some maternity tops for $3 a piece! There's still quite a bit left over to make some sleeves for a baby outfit. More on that later. :)


Since I'm expecting at the end of the summer season, I know that I will be needing some tank tops. 

Even in the winter, a maternity tank top is my number one 'must have' in the pregnancy wardrobe. I love that I can layer them, so when the hot flashes are too much, I can easily cool off - and I like that I can layer a cardigan over them without too much bulk. And who wants to buy maternity cardigans? I'll just use my own, thank you!

But for summer - I need tank tops during pregnancy. Period. I love to work in the garden without the irritating sleeves getting in the way. I want to be inside and outside without feeling like I need to shed clothing. I want to feel normal - and normal is NOT a tent...AKA maternity shirt.
My biggest issue with ANY maternity shirt, is the length. They are never long enough, especially at the end of my pregnancies. This maternity shirt pattern will be long enough to cover all tummies, from beginning to the end of the pregnancy. I want it to look classy enough for church, yet comfortable enough to lounge around in.

A big thing that I want this maternity shirt pattern to be - NORMAL in the back. I don't want my backside to look pregnant! I plan on rouching the shirt in the front only! It will give a smooth, classic look to the back, yet will allow for growing baby bellies in the front. I can't wait!

maternity tank top pattern
Overall, I like the design of this maternity shirt pattern, but I am going to take it in a bit on the sides to make it a little more fitted. I also want to make the straps less wide (although the wide straps are very cute!). I'm hoping that I will have an adorable and perfected design for a maternity tank top pattern very soon!
What do you think? If you could design your very very own, what would you want? Length, appropriate neckline that covers the "extra pregnancy" cleavage? Plenty of length in front, 'un-tent' style....you name it! I want to hear about it!

Thursday, March 17, 2016

Non Profit Diaper Design - helping in a creative way

I'm really excited as this week comes to a close. With it, also comes the end of a project that I've been working on. A Diaper project. My favorite.

Recently a non-profit, ministry, outreach company found me. They asked if I would make a few 'simple changes' to a cloth diaper design that I had. I frequently have customers asking if I can tweak things for them, so I figured I just had to tell them simple directions on what they wanted.
After a few emails, however, I discovered that they wanted an entirely new design, complete with their own thoughts and ideas.
It turns out that this organization is committed to helping mothers worldwide. They have their hands in the crisis situations, rescuing women and families from trafficking, evacuees, abuse, and many other avenues. They are hiring a team of these rescued women to sew cloth diapers to raise money for their cause. What an amazing ministry!
They hired me (ME!!) to design this diaper for them. It's been a series of turns and changes, but I will be sending the final version this weekend. I'm stoked!

I usually only work for myself, but this has been such a valuable opportunity - to not only help others, but learn how to design for someone else. I'm so thankful.
I have used one of the earlier versions of this diaper design and modified it to my flavor. I have it for sale here.
It's an All In One diaper pattern. Normally AIO diapers come in multiple multiple sizes. This system is only TWO sizes for a perfect fit on any baby from 7-35 lbs. You'll love to add it to your fluff stash. I hope that you love what it represents as you add these to your sewing project list.


Every time I'm diaper making and I come across this pattern, I will remember what a great opportunity this was.

Have you ever had an opportunity that turned out to be unexpectedly amazing?

Monday, March 14, 2016

Fabric Necklace Pattern

Accessorizing babies is so much fun. I love to put fabric necklaces on my little ones. Is there anything better than being able to whip one out in 10 minutes? Now you can with this fabric necklace pattern.

how to make a perfect baby necklace

This tutorial for a fabric necklace is super simple and it takes items that you might already have laying around in your house or craft room! 


how to make a cloth necklace

I give you tips on length of your fabric as well as ideas to tie or put a snap on the end to secure the necklace in place.

baby accessory necklace pattern

I love that the head accessory can match the necklace.


how to make a teething necklace
This easter dress wouldn't be complete without the adorable necklace


teething necklace pattern

I also give you adult sizes for this necklace pattern so that you can make some for yourself for any outfit! It's also an excellent way to make a teething necklace that will look cute on you, and will keep a little one busy.

all toddlers need a necklace

Perfect length. I love how it naturally follows the line of the shirt.

fabric necklace pattern for babies

Even busy babies won't mind being accessorized because it won't get in their way!

fabric necklace pattern

I can't wait for you to try this fabric necklace pattern! let me know if you have questions!


How to fix a plastic snap

I love my snap press. It makes me happy to attach great snaps to anything. Whether a diaper, or clothes, I know that the snaps will outlive the item that I'm making. Unfortunately I tend to fly through my projects sometimes, and that can make for some 'snappy' disasters. I frequently attach a snap backwards or in the wrong place. Then I'm stuck with it. What makes matters worse, is that snap attachment is almost always the last step to a project!
I have a new solution! I made a quicky tutorial video to show off the new way that I'm removing messed up snaps.

If you can't watch the video, here's the quick version.
My husband had a soldering iron in the garage that never got used. It has a pointy tip on the end and it gets really hot! If your husband doesn't have one, they are very cheap on amazon:


If you put the snap on wrong, simply heat up the soldering iron and put the pointy tip into the snap. It will melt. While it's hot, pull the snap part. It's that simple! It comes right off! Just be careful not to lay that soldering iron on anything in your sewing room or you'll have a melted or burned mess on your hands.


Monday, March 7, 2016

Two Size AIO Diaper system

Recently I was asked to make a new diaper design. Diapers are always my favorite patterns to work on, so I eagerly took the opportunity!
My client wanted an AIO cloth diaper. That's "all in one" if you don't know. All in one simply means that you can literally take it out of the washing machine and put it on your baby. Nothing to remove, nothing to add, nothing to pin or snappy. An AIO is literally ALL IN ONE.

I like AIOs, but since 2009 I have put them on the back burner and I've been using ai2's. I'm sure that I'll write about the details on that sometime, but for now, we'll put a pin in it. 


I forgot how much I loved the cushy feel of an AIO. The ease of use. Oh my! Just put it on and go!
My client wanted an extra insert/doubler that would snap in. I liked that idea and ran with it. This doubler would be perfect for naptime or night time and would fit perfectly into this diaper!
They have sergers that they are planning on sewing with, but don't worry....I made the pattern compatible with a regular sewing machine. If you have a zig zag stitch you can whip out these doublers without any issues at all!


I wanted to give them something that was ACTUALLY aio though, so I wanted to make sure that the sewn in soaker would be adequate. In so many patterns that I've seen, the soaker is so small (so it's not too bulky), that you actually HAVE to use an extra insert/doubler to make it work properly. I didn't want my customers or their customers to have to worry about that, so you'll find the perfect size attached soaker with perfect placement marks included in this pattern.


My client originally wanted something that was a two part system that went all the way down to 5 lbs. They weren't entirely realizing though that a baby at potty training age is frequently around 30-35 lbs. That's a huge range. As wonderful as it seemed initially, I found that it's just not feasible to put a 35 lb diaper range that fits a 5 lb preemie. After a couple talks and some working on it though, we got the pattern situated to be a 7-16 lb small size and a 15-35 lb large size.
It's fantastic.


But don't worry, I kept my original plan on the newborn diaper, which fits 5-12 lbs. I'll be making an entirely separate pattern/tutorial for that.

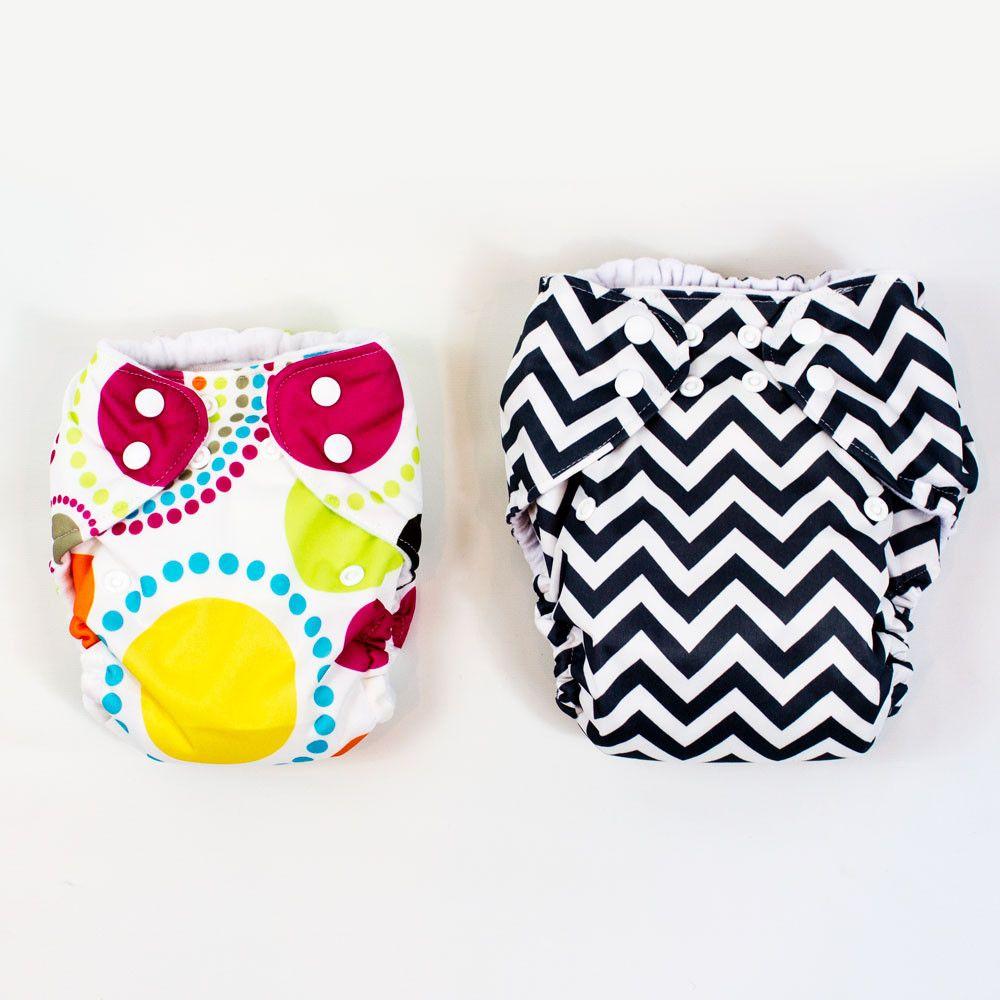
You'll notice that all of the pictures have snaps. Yes. This design is a snap only one. However, if you are in love with velcro, feel free to alter it to suit your needs! I just find that snaps hold up better to wriggling toddlers and multiple washings. They might be a little more tedious to put on initially, but well worth it.
I have an excellent source that I buy snaps from and I share that on my  "supplies I love" page.


Once we had the system sizes worked out, from there I was perfecting the shape. The legs will always fit nice and snug without leaking. The back has a wonderful amount of elastic in it as well. Because of the sewn in soaker, it has a rigid, yet pleasant feel that I'm sure you will love to put your baby in.

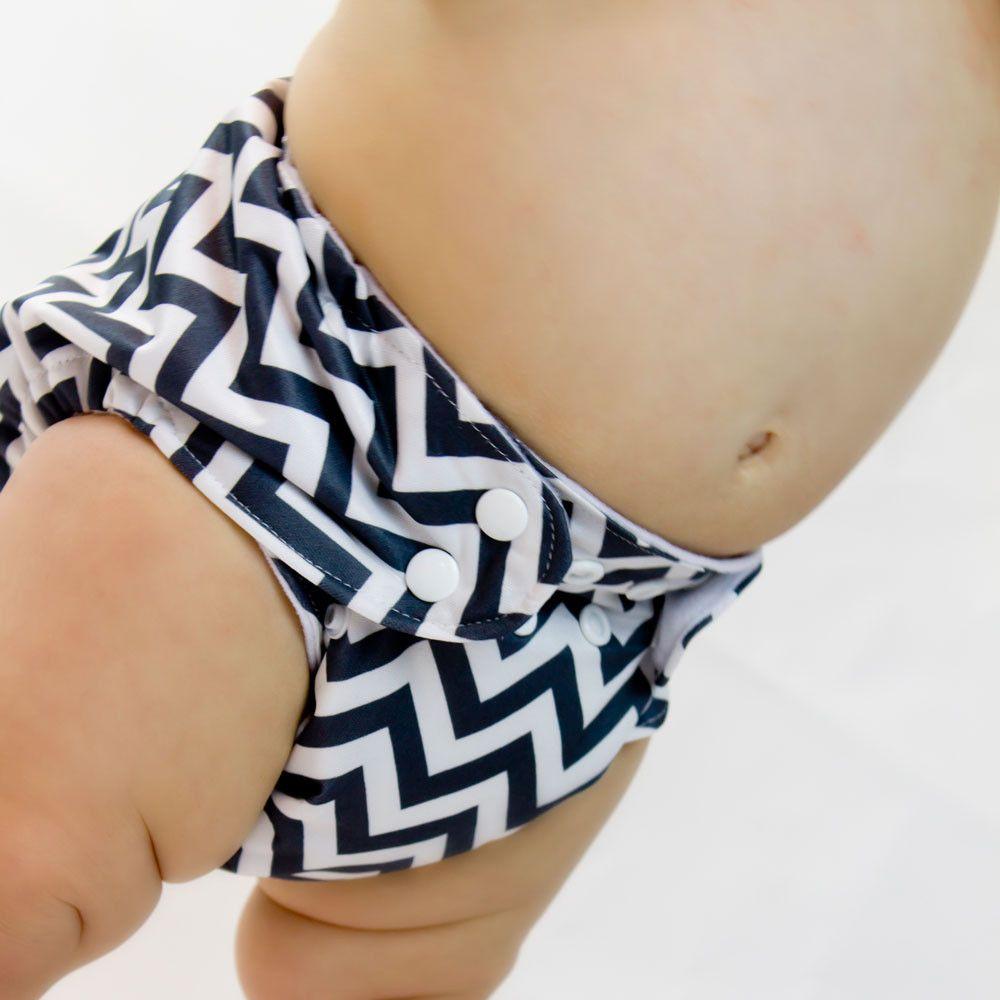
On my first trial, I put this diaper on my baby Elijah. He's 25 lbs. This is the size Large diaper and it's rise is unsnapped. He isn't walking yet, so once he starts, I'm sure that I will have to adjust the rise and waist as he slims down.
Did I mention that the rise has snap downs on both the small and the large? The rise adjusts from 14.5, 16, 16.5, 17.7, and 19. WHOA! Talk about perfect fit for any baby!

oh those chubby baby legs. I could just eat him up!


On such a busy baby, this diaper has to do the trick of staying put. My client was certain that it needed hip snaps, and I put them on the pattern. However, after wriggling and crawling, and crazy days, I found that the hip snap wasn't necessary...and in fact, it was kind of a pain to put on - so don't worry! I won't make you put it on in this design.


Will you look at that snazzy profile! 
That's a beautiful diaper if I do say so myself!


All in all, I love this design! 
If you are just starting to cloth diaper, this is an excellent way to get your feet wet, or even make an entire stash! You'll love that there's only two sizes to worry about, which will save time and money (instead of making 4-6 sizes)

Click the image below to see the new AIO Diaper pattern up and running!